Uncategorized
15 Common Candle Making Mistakes and How to Fix Them
May
The difference between a luxury scented candle and a wasted batch of soy wax often comes down to a single degree of temperature. You’ve likely felt the frustration of pouring your heart into a project only to find sunken centers or a scent that disappears the moment you strike a match. It’s disheartening to watch expensive fragrance oils and premium soy wax flakes go to waste because of common candle making mistakes that happen despite following basic instructions. We understand that your goal is to create a clean, calming environment, and every failed pour feels like a step away from that peace.
You can achieve professional results by focusing on the precise margins of the craft. This guide will teach you how to identify and resolve the most frequent pitfalls so you can enjoy smooth candle tops and a strong hot throw every time. We’ll walk through 15 specific fixes, including proper curing times and the latest 2026 safety standards like the UK CLP and US FTC labeling requirements. By the end, you’ll have the technical knowledge to ensure your handmade scents burn safely and consistently, allowing you to share your botanical creations with confidence.
Key Takeaways
- Understand how precise pour temperatures prevent frosting and sinkholes, ensuring your soy wax sets with a smooth, professional finish.
- Learn to select the correct wick size to achieve a full melt pool and prevent tunnelling, which preserves the life of your candle.
- Master fragrance load percentages to avoid oil sweating and resolve common candle making mistakes that lead to a weak scent throw.
- Establish a rigorous testing protocol and maker’s log to ensure every batch meets safety standards and provides a consistent burn.
- Discover how to maintain the aromatic integrity of premium oils by avoiding overheating, protecting the therapeutic quality of your botanical blends.
Mastering Temperature: Why Heat and Pour Settings Are Critical
Precision is the heartbeat of a high-quality candle. While it feels like a creative pursuit, successful candle making is actually a series of delicate thermal reactions. One of the most common candle making mistakes is treating temperature as a suggestion rather than a rule. To master the craft, you must understand two critical terms: Flash Point and Pour Temperature. The flash point is the specific temperature at which a liquid’s vapors can ignite if exposed to a flame. While you’ll rarely reach this in a double boiler, staying well below it preserves the oil’s integrity. Pour temperature is the heat level at which the wax should enter the jar to ensure a smooth, professional bond.
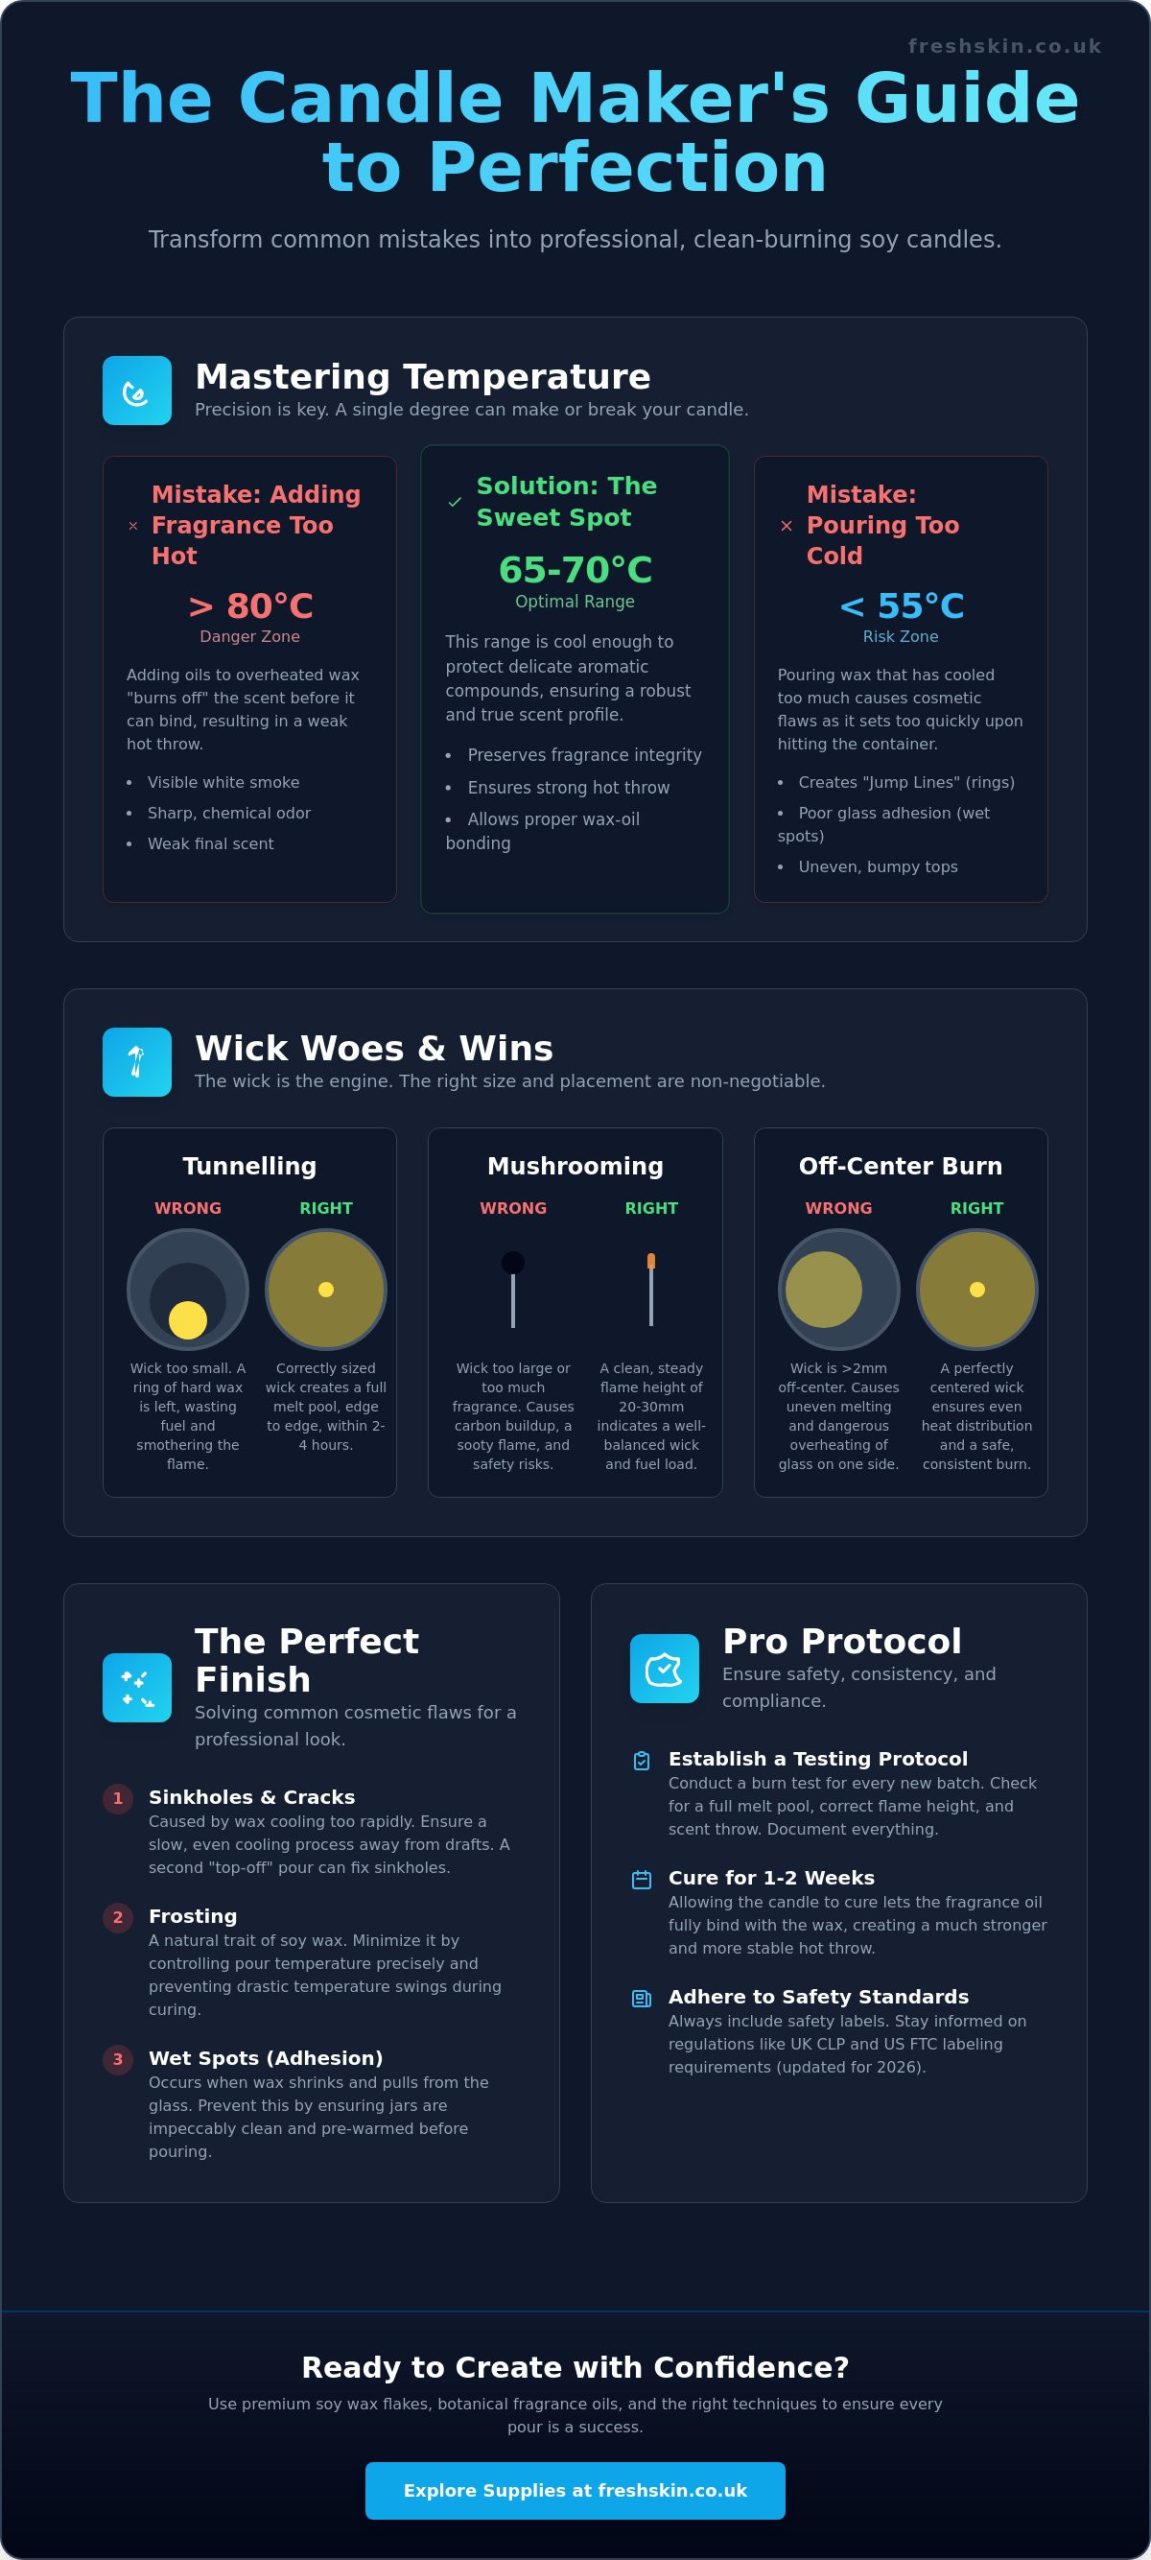
Overheating your wax doesn’t just risk safety; it actively destroys the delicate aromatic profiles of natural ingredients like Lavender Essential Oil or Eucalyptus Essential Oil. If you add these oils to wax exceeding 80°C, the heat can “bruise” the scent, leading to a finished product that smells dull or slightly scorched. Using a digital thermometer to achieve 1°C precision allows you to hit the “sweet spot” where the wax is liquid enough to mix but cool enough to protect the fragrance. Understanding how candles work at a molecular level helps you see that wax is a carrier, and its temperature dictates how well it holds your botanical ingredients. In the UK, ambient room temperatures can be quite low, which makes monitoring your cooling wax even more vital to prevent premature setting.
The Danger of Adding Fragrance Too Hot
Adding your fragrance oil at the wrong time is a recipe for a weak hot throw. If the wax is too hot, the aromatic compounds evaporate or “burn off” before the wax can trap them. For fragrance oils like Baby Powder or Fresh Linen, we recommend an optimal window of 65-70°C. Watch for these warning signs that your wax is too hot:
- Visible plumes of white smoke after adding the oil.
- A sharp, chemical odor that differs from the oil’s natural profile.
- Rapid, bubbling evaporation of the oil upon contact with the wax.
Pouring Too Cold: The Cause of “Jump Lines”
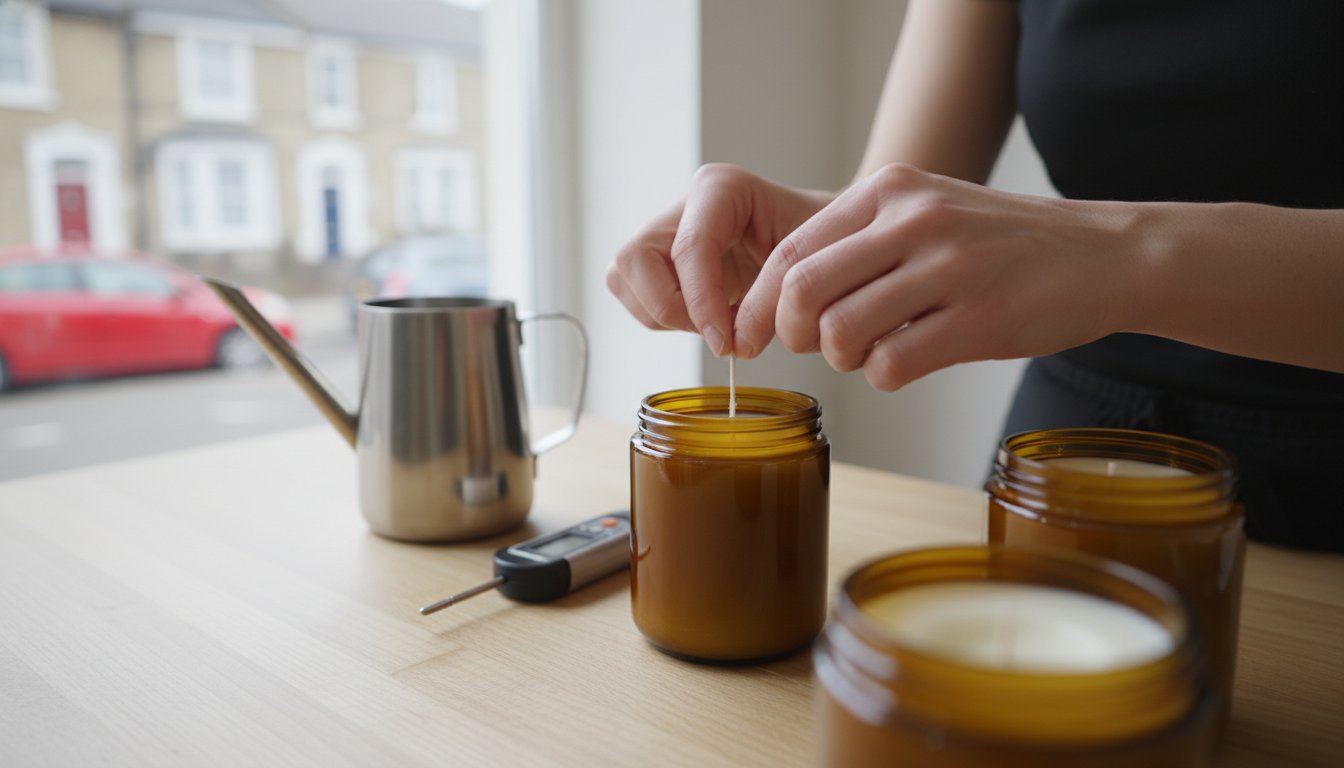
UK workshops often have drafts that disrupt the cooling rhythm. If your wax cools too much before you pour, or if your containers are too cold, you’ll encounter “jump lines.” These are unsightly horizontal rings that form because the wax begins to set the moment it touches the glass. You can combat this by gently warming your amber glass bottles or jars before pouring. We also suggest a “Slow Pour” technique. Pouring slowly and steadily prevents the wax from splashing and helps avoid trapping air bubbles. This simple change in pace is essential for achieving a clean finish with soy wax flakes.
Wick Woes: Avoiding Tunnelling, Mushrooming, and Off-Centre Burns
The wick serves as the engine of your candle, drawing liquid wax upward to fuel the flame. Wick selection is where many common candle making mistakes begin to surface, often resulting in a candle that performs poorly or poses a safety risk. A successful burn relies on creating a “melt pool” that reaches the very edge of the container within two to four hours. If the wick is too small, the heat won’t extend to the glass, leaving a ring of hard wax around the perimeter. This is known as tunnelling. Tunnelling doesn’t just waste your premium soy wax flakes; it eventually creates a deep trench that smothers the flame by restricting oxygen.
Mushrooming is another frequent hurdle, characterized by a carbon buildup at the tip of the wick that resembles a small fungus. This usually happens when the wick is drawing more fuel than it can cleanly burn, often due to an oversized wick or a high concentration of fragrance oil. Precision also extends to the physical placement of the wick. If the wick is even 2mm off-centre, the heat distribution becomes lopsided. This causes the glass to overheat on one side while the other side fails to melt, potentially leading to cracked jars and ensuring your products align with established candle safety standards.
Choosing the Right Wick Size for Soy Wax
Natural soy wax has a higher density and a different viscosity than paraffin, meaning it requires a wick with more “pull” to stay lit. When you are under-wicked, the flame will struggle and eventually drown in its own wax. To find the perfect match, perform a burn test. For a standard 30cl candle jar, which typically holds 220g of fragranced wax, the flame height should remain between 20mm and 30mm. If the flame flickers aggressively or the jar becomes too hot to touch, you’ve likely over-wicked, which is a significant fire hazard.
The Importance of the First Burn
Wax has a “memory.” The very first time you light your candle determines how it will behave for the rest of its life. You should follow the “one hour per inch” rule: if your jar is three inches wide, let it burn for at least three hours. If a customer has already started a tunnel, you can sometimes rescue the candle by wrapping the top in tin foil to reflect heat back toward the edges, though you must never leave a candle unattended during this process. Educating your community on trimming wicks to 10mm before every light will ensure they enjoy a clean, safe, and fragrant experience with every burn.
Solving Cosmetic Imperfections: Frosting, Sinkholes, and Wet Spots
Creating a candle that smells wonderful is a significant victory, but the visual finish often dictates how your work is perceived by others. Cosmetic flaws are among the most frequent common candle making mistakes that makers face, especially when working with natural materials. Frosting, those white crystalline structures on the surface or sides of a jar, is a natural trait of soy wax flakes. It occurs as the vegetable fats crystallize and try to return to their natural state. While it doesn’t affect the burn quality, it can look like a defect to the untrained eye. Similarly, “wet spots” aren’t actually wet; they are simply areas where the wax has pulled away from the glass due to shrinkage during temperature changes.
These imperfections often stem from the complex molecular behavior explained in the science of candle burning. For small businesses or hobbyists looking to gift their creations, a smooth, creamy finish builds trust. It signals that the maker has mastered the technical nuances of the craft. When a customer sees a sinkhole or a patchy surface, they might worry about the internal quality or the consistency of the scent. Addressing these issues ensures your botanical creations look as luxurious as they smell.
Preventing Frosting in Natural Waxes
Natural waxes are temperamental. To minimize frosting, you must control the cooling rate with patience. Avoid placing candles in cold drafts or on stone countertops that sap heat too quickly. Instead, let them cool on a wooden surface or a wire rack in a room with a steady temperature. Stirring is also a factor. While you must mix your Lavender Essential Oil or Fresh Linen Fragrance Oil thoroughly, over-stirring introduces excess air and encourages crystal growth. If frosting appears, a quick pass with a heat gun on its lowest setting can often smooth the surface without melting the entire candle.
Eliminating Sinkholes and Air Pockets
Sinkholes are hidden voids that form near the wick as wax shrinks during cooling. These are usually caused by pouring your wax too quickly or at a temperature that is too high for the ambient environment. These internal pockets can lead to flame flickering and inconsistent scent throw because the wick loses its fuel source momentarily. You can resolve this using a few simple steps:
- The Poke and Pour Method: Once the candle has partially set, use a skewer to gently poke holes around the wick to release trapped air.
- The Second Pour: Fill these holes with a small amount of leftover wax at a slightly higher temperature to seal the voids and level the top.
- Steady Speed: Pouring slowly and steadily is the most effective way to prevent air from becoming trapped in the first place.
Fragrance Oil Failures: Load Percentages and Curing Science
Achieving a scent that fills a room requires more than just pouring a bottle of oil into melted wax. One of the most common candle making mistakes is the belief that a higher fragrance load automatically results in a stronger candle. Every wax has a physical saturation point. If you exceed this limit, the oil cannot bond with the wax molecules. This leads to “sweating,” a condition where pools of liquid oil seep to the surface of the set candle. Sweating is more than a cosmetic flaw; it represents a fire hazard because the concentrated oil can ignite on the surface. Understanding the balance between your wax and your aromatics is the first step toward a professional finish.
The relationship between the “cold throw”—how the candle smells when unlit—and the “hot throw”—the aroma when burning—is dictated by this molecular bond. If the oil is not properly integrated, the scent will stay trapped or burn off too quickly. For a deeper understanding of how to handle these delicate ingredients, you may find our guide on Fragrance Oils: The Ultimate Guide to Scents, Safety, and DIY Crafting in 2026 helpful. It provides the necessary context for using both natural and synthetic aromatics safely.
Calculating the Perfect Fragrance Load
Precision beats guesswork every time. We recommend following the 6% to 10% rule for most botanical waxes. This means if you have 1000g of Soy Wax Flakes, you should use between 60g and 100g of fragrance. Always use a digital scale. Measuring by volume in milliliters is a mistake because the density of oils varies significantly. A dense Lavender Essential Oil weighs more than a lighter Fresh Linen Fragrance Oil, even if they look the same in a measuring cup. Getting the weight right ensures the wax can hold the oil without it leaching out later.
The Patience of Curing: Why 2 Weeks is the Gold Standard
Curing is a chemical process, not just a drying period. While some hobbyists suggest lighting a candle after 48 hours, soy wax requires more time to stabilize. The vegetable fats in soy form a complex crystalline structure that slowly traps the fragrance molecules. A 14-day cure allows this bond to fully mature. If you test your candle too early, you’ll likely experience a weak hot throw and assume you didn’t use enough oil. Try a “Cure Test” yourself. Light one candle after 24 hours and another from the same batch after 14 days. The difference in scent clarity and strength is usually remarkable. Patience is the secret ingredient in high-end candle making.
The Testing Protocol: How to Perfect Your Candle Batch
The final step in your creative journey isn’t the pour; it’s the proof. Testing one candle from every single batch is a non-negotiable safety step that separates hobbyists from true artisans. Skipping this phase is one of the most common candle making mistakes because it leaves the performance of your creation entirely to chance. By keeping a detailed Maker’s Log, you can track the specific temperatures, fragrance loads, and wick types used for every batch. This record becomes your personal encyclopedia of success, allowing you to replicate your best results and troubleshoot failures with scientific accuracy. If you’re just starting out, our guide on How to Make Candles: A Beginner’s Masterclass in Crafting Scented Bliss offers a solid foundation for building these habits early.
Conducting a Safe Burn Test
A burn test is the only way to verify that your wick and wax are working in harmony. It’s a structured process that requires patience and close observation. You should always perform this in a draft-free environment to get the most accurate results.
- Step 1: Record your starting data. Ensure the wick is trimmed to exactly 10mm and note the ambient room temperature to account for cooling variables.
- Step 2: Light the candle and let it burn for a full 4 hours. Measure the melt pool depth; it should ideally be about 1/2 inch deep and reach the edges of the jar.
- Step 3: Monitor the flame behavior throughout the test. The height should stay below 3cm, and there should be no visible sooting or black smoke. Check that the glass jar isn’t becoming too hot to touch safely.
UK Safety and Compliance (CLP)
If you intend to gift or sell your candles, you must navigate the legal landscape of safety labeling. As of February 2026, UK candle makers are required to comply with the Classification, Labelling and Packaging (CLP) regulation. This means your labels must display specific hazard pictograms and safety information based on the ingredients you use, such as Tea Tree Essential Oil or Peppermint Essential Oil. Freshskin provides the necessary safety data sheets for our fragrance and essential oils, making it easier for you to create compliant labels. Before your candle leaves your workshop, ensure it includes the mandatory ASTM F2058 safety statements: “Burn within sight,” “Keep away from things that catch fire,” and “Keep away from children.” This commitment to transparency protects both you and your community, ensuring that every botanical scent is enjoyed with total peace of mind.
Perfecting Your Craft One Pour at a Time
Mastering the art of candle making is a journey of patience and precision. By understanding the science of temperature and the necessity of proper curing, you can transform your creative hobby into a professional craft. We’ve explored how avoiding common candle making mistakes like incorrect fragrance loads and improper wick sizing ensures a safe, beautiful result every time. These small adjustments in your process make the difference between a wasted batch and a high-quality botanical creation that brings peace to your home.
As a family-run UK business since 2010, we’re dedicated to supporting your journey with high-purity essential and fragrance oils that meet the highest standards. Whether you’re a hobbyist or a wholesaler, our fast UK delivery ensures you have the supplies you need when inspiration strikes. Ready to start your next batch with confidence? Explore our range of premium fragrance oils and soy wax flakes. Your path to creating consistent, luxury scents starts with the right ingredients and the knowledge to use them well. Keep experimenting, and enjoy the therapeutic process of crafting something truly unique.
Frequently Asked Questions
Why does my candle have a hole around the wick after it cools?
These holes are known as sinkholes and are caused by air becoming trapped as the wax shrinks during the cooling process. To fix this, you should use a skewer to gently poke the wax around the wick to release the air and then fill the gap with a small amount of warm wax. Pouring your wax more slowly at a lower temperature also prevents these voids from forming in the first place.
How much fragrance oil should I actually add to soy wax?
You should aim for a fragrance load between 6% and 10% of the total weight of your wax. For example, if you are using 500g of soy wax flakes, you would add between 30g and 50g of oil. Adding more than 10% often leads to “sweating,” where the excess oil seeps to the surface because the wax structure can no longer hold the liquid aromatics.
Can I use essential oils instead of fragrance oils in candles?
Yes, you can use high-purity options like Lavender Essential Oil or Eucalyptus Essential Oil to create a natural, therapeutic atmosphere. However, essential oils often have lower flash points than synthetic oils, so you must be very precise with your temperatures. They typically provide a more subtle scent throw, which is ideal for those who value clean, botanical compositions over heavy perfumes.
Why is there black soot on the inside of my candle jar?
Black soot is usually a sign that your wick is too large or hasn’t been trimmed properly before lighting. When the flame is too large, it consumes more fuel than it can cleanly burn, leading to carbon buildup on the glass. Trimming your wick to exactly 10mm before every burn and ensuring your jar is kept away from drafts will help resolve these common candle making mistakes.
How do I stop my soy wax candles from frosting?
You can minimize frosting by allowing your candles to cool slowly at a consistent room temperature on a wooden surface. Frosting is a natural crystalline growth that occurs in vegetable waxes like soy as they try to return to their natural state. While it doesn’t affect the burn quality, you can gently use a heat gun on its lowest setting to smooth the surface if you prefer a creamy finish.
What is the best temperature to add fragrance oil to melted wax?
The optimal temperature for adding fragrance oil to soy wax is typically between 65°C and 70°C. Adding the oil at this specific point ensures it binds effectively with the wax molecules without the scent “burning off” due to excessive heat. Using a digital thermometer to reach 1°C precision protects the integrity of delicate scents like Fresh Linen or Baby Powder, ensuring they are trapped safely as the wax sets.
Why does my candle have no scent throw when lit?
A poor hot throw often results from adding fragrance oil to wax that is too hot or failing to use the correct wick size. If the oil evaporates during the pouring process, the scent won’t be present when you light the wick. Additionally, if your wick is too small, it won’t create a large enough melt pool to release the fragrance into the room. Correcting these common candle making mistakes will ensure a much stronger aromatic experience.
How long do I really need to let my candles cure?
You should let soy wax candles cure for a full 14 days to achieve the best scent performance. While it’s tempting to light them after 48 hours, the molecular bond between the wax and oils like Rosemary Essential Oil takes time to stabilize. This patience ensures that when you finally light your candle, the aroma is clear, strong, and consistent throughout the entire life of the product.