Uncategorized
Soap Making for Beginners: A Complete UK Guide for 2026

Mar
Have you ever dreamt of creating your own beautiful, handcrafted soaps, only to feel daunted by the different methods and the chemistry involved? The world of cold process, hot process, and the careful handling of lye can seem intimidating, but we believe the joy of soap making should be accessible to everyone. As a UK-based, family-run business passionate about pure, botanical ingredients, we’re here to gently guide you past the uncertainty and into a world of creativity and self-care.
This complete guide is designed to do just that. We will demystify the entire process, helping you choose the best starting method and providing a clear, concise list of essential equipment and ethically sourced oils. You’ll find a simple, reliable recipe for your very first batch, along with the safety knowledge to proceed with confidence. Let’s transform that initial hesitation into the pure satisfaction of crafting a beautiful, therapeutic bar of soap with your own hands.
Key Takeaways
- Discover the Melt & Pour method, the safest and most straightforward way for beginners to create beautiful soap without handling lye.
- Understand the handful of essential, botanical ingredients required to craft your first batch of pure, homemade soap.
- Follow our simple, step-by-step recipe to confidently create your very first bar of calming lavender soap at home.
- Embrace the rewarding craft of soap making to gain complete control over your skincare and learn how to advance your skills.
The Joy of Homemade Soap: Why Start Soap Making?
Welcome to the wonderfully creative world of artisan soap making. This timeless craft is more than just a hobby; it’s a practical skill that empowers you to create beautiful, effective, and truly personal skincare. Imagine the deep satisfaction of lathering up with a luxurious bar of soap that you crafted with your own hands, knowing every single ingredient that touches your skin. It’s a simple joy that connects you to a long tradition of self-sufficiency and natural wellness.
From choosing nourishing oils to creating unique gifts for friends and family, this journey offers endless possibilities for creativity. You are in complete control, crafting a product that is perfectly tailored to your values and your skin’s needs.
What is Soap, Really? A Simple Explanation
At its core, true soap is the result of a chemical reaction called saponification. This process occurs when fats and oils (like olive oil or shea butter) are carefully combined with an alkali solution (lye). While lye is a caustic substance required for the reaction, a proper curing period ensures it is completely neutralised, leaving behind only pure, gentle soap and moisturising glycerine. To learn more, you can explore the rich history and science of soap and see how this process differs from modern manufacturing. This is the key distinction between handmade soap and many commercial ‘beauty bars’, which are often made from synthetic detergents that can strip the skin of its natural oils.
The Benefits of Crafting Your Own Soap
Embracing this craft allows you to curate a bathing experience that is both luxurious and beneficial. The advantages of creating your own soap are clear and compelling:
- Total Ingredient Control: You choose every component. Select rich, botanical butters and oils like nourishing avocado oil for dry skin or cleansing coconut oil for a bubbly lather, ensuring the final bar is perfect for your specific needs.
- Pure, Natural Aromas: Forget synthetic fragrances. You can infuse your creations with 100% pure essential oils, harnessing their therapeutic properties and beautiful, natural scents for a truly aromatherapeutic experience.
- Avoid Unwanted Additives: Commercial soaps can contain a host of harsh detergents, preservatives, and artificial colourants. By making your own, you can create a gentle, skin-loving bar free from anything you’d rather avoid.
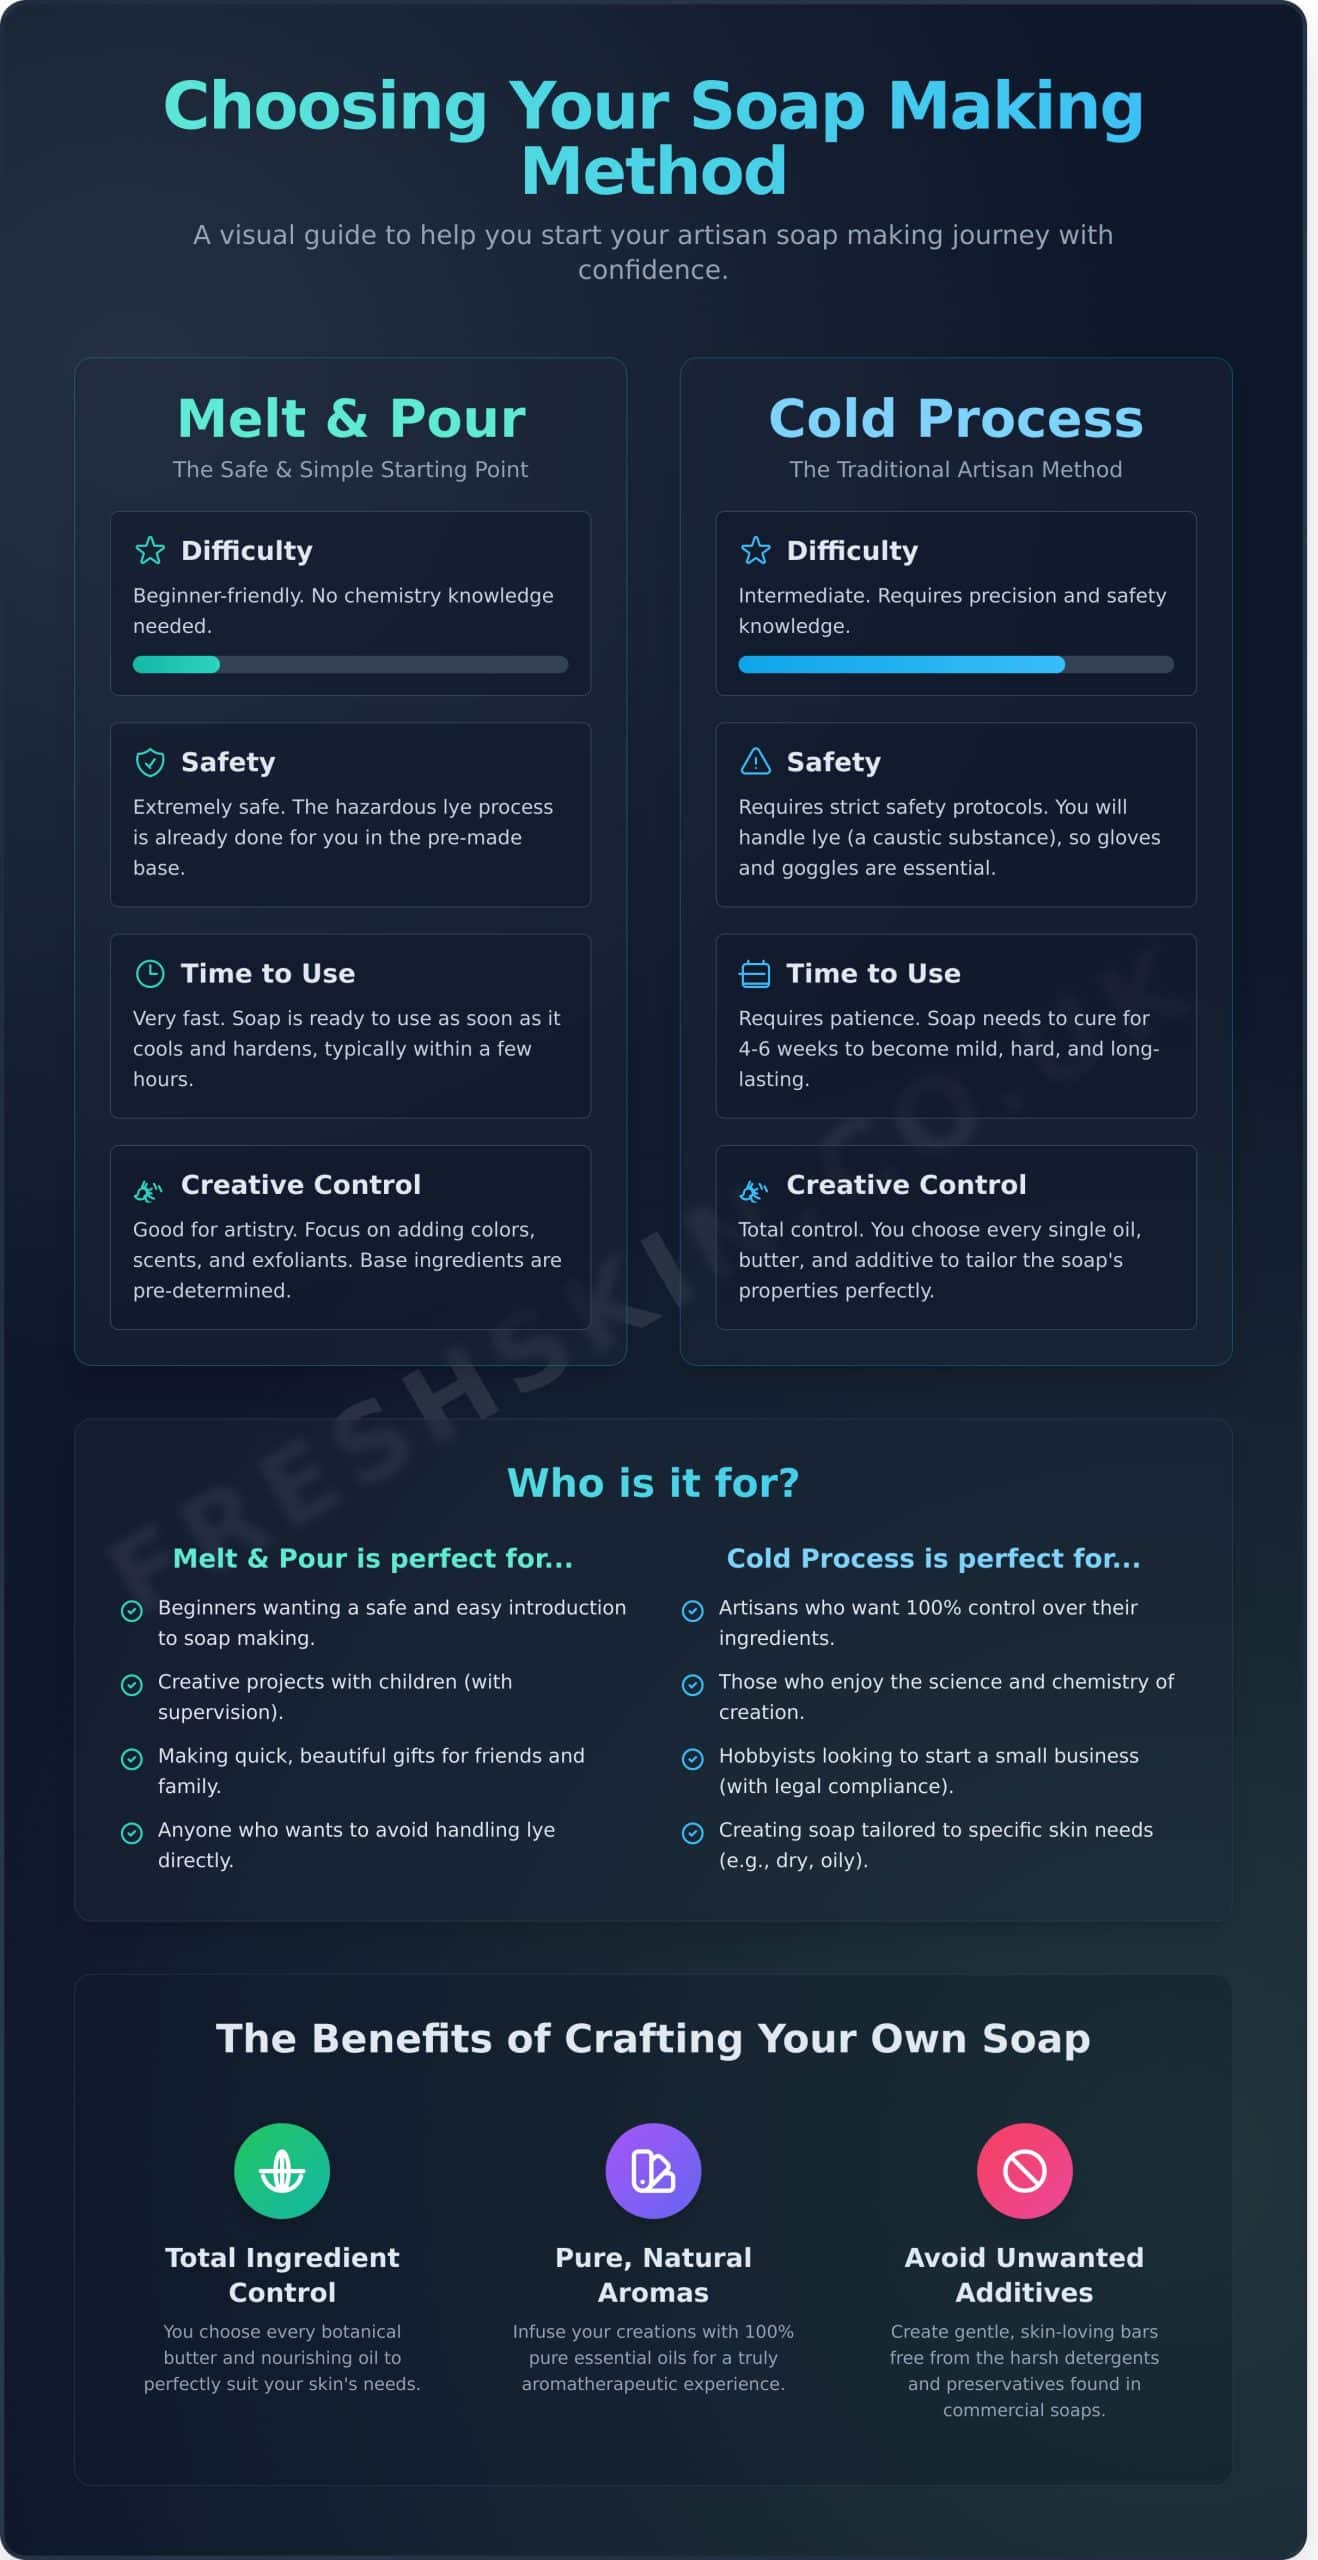
Choosing Your Method: Melt & Pour vs. Cold Process
Embarking on your soap making journey begins with a fundamental choice: which method will you use? For beginners in the UK, two paths are most common, each offering a unique creative experience. To help you start with confidence and clarity, we’ll demystify the gentle introduction of Melt and Pour and the traditional artistry of the Cold Process method.
Melt and Pour: The Perfect Starting Point
We believe the best starting point is Melt and Pour. Think of this method as creative soap assembly, where you begin with a high-quality, pre-made soap base. The complex and hazardous stage involving lye has already been safely completed for you. Your role is purely artistic: you simply melt the base, then infuse it with your chosen pure essential oils, botanical colourants, and natural exfoliants before pouring it into a mould. The primary advantage is its safety and speed; your beautiful soaps are ready to use almost as soon as they cool and harden.
Cold Process: The Traditional Artisan Method
This is the classic way of making soap from scratch, a truly rewarding skill that combines natural oils and butters with a lye solution (sodium hydroxide). This process, known as saponification, gives you complete control over every single ingredient, from the therapeutic properties of the oils to the final texture. It demands precision and strict safety protocols, including wearing protective gloves and goggles at all times. If you plan to sell your artisan creations, it’s essential you comply with all UK cosmetic safety regulations. Cold Process soap requires a curing period of 4-6 weeks to allow saponification to complete and excess water to evaporate, resulting in a harder, milder, and longer-lasting bar.
.comparison-table { margin-top: 2em; margin-bottom: 2em; }
.comparison-table table { width: 100%; border-collapse: collapse; text-align: left; }
.comparison-table th, .comparison-table td { border: 1px solid #ddd; padding: 12px; }
.comparison-table th { background-color: #f7f7f7; }
| Feature | Melt & Pour | Cold Process |
|---|---|---|
| Difficulty | Beginner-friendly | Intermediate |
| Lye Handling | None (pre-made base) | Required (handle with care) |
| Customisation | Good (scent, colour, additives) | Total (oils, liquids, additives) |
| Cure Time | A few hours to set | 4-6 Weeks |
The Essential Ingredients: Your Soap Making Shopping List
Embarking on your soap making journey is an exciting creative process. For beginners, the Melt and Pour method provides a wonderfully safe and satisfying entry point, allowing you to focus on artistry without handling lye. The first step is to gather your high-quality ingredients, which will form the heart of your beautiful, handcrafted soaps. Think of this as your foundational palette for crafting something truly special.
Soap Bases, Butters & Carrier Oils
The foundation of any Melt and Pour project is the soap base itself. These pre-made blocks are ready to be melted, customised, and poured. We recommend starting with one of these popular, skin-friendly options:
- Clear Glycerine Base: Perfect for achieving vibrant colours and embedding dried botanicals.
- Shea Butter Base: Creates a wonderfully creamy, opaque bar with a rich and nourishing lather.
- Goat’s Milk Base: Known for its gentle, moisturising properties, making it ideal for sensitive skin.
To elevate your creation, consider adding a small amount of extra butter. A spoonful of pure Shea Butter or Cocoa Butter can enhance the soap’s creamy texture and skin-loving benefits. For an added touch of luxury, a teaspoon of a carrier oil like Sweet Almond Oil or organic Coconut Oil will give your finished bar a silky, moisturising feel.
Scents & Colours: Bringing Your Soap to Life
This is where your personal flair truly shines. For scent, you can choose between the natural, therapeutic properties of essential oils or the diverse, powerful aromas of fragrance oils.
- Essential Oils: For a 100% natural scent, choose pure essential oils. Calming Lavender or cleansing Tea Tree are timeless classics with botanical benefits.
- Fragrance Oils: These offer a wider range of scents, from ‘Fresh Linen’ to ‘Vanilla Bean’, perfect for achieving a specific, long-lasting fragrance profile. Our guide on Essential Oils vs. Fragrance Oils can help you decide.
To add colour, turn to natural ingredients like cosmetic clays, micas, and powdered botanicals for stunning, earthy tones. It’s vital to use skin-safe additives; if you ever plan to sell your creations, you must ensure every component complies with the official UK cosmetic safety regulations, which govern everything from ingredients to labelling.
Your First Bar: A Simple Melt & Pour Lavender Soap Recipe
Now for the most rewarding part of your journey into soap making: creating your very first, beautifully handcrafted bar. This simple recipe uses the melt and pour method, a wonderfully gentle introduction that allows you to focus on the artistry without handling lye. We will be crafting a calming lavender soap, perfect for a soothing bath or as a thoughtful handmade gift.
Step 1: Gather Your Equipment & Ingredients
Precision is key to a perfect bar. Before you begin, gather everything you need and measure your ingredients by weight using a digital scale. This ensures your results are consistent every time.
- Ingredients: 500g of a nourishing Shea Butter Melt & Pour Base, 10ml of our 100% pure Lavender Essential Oil, and 1 tablespoon of dried lavender buds (optional, for texture and decoration).
- Equipment: A digital scale, a large microwave-safe measuring jug, a silicone loaf mould, and a heat-resistant spatula or stirring rod.
Step 2: Melt, Mix, and Pour
First, carefully cut your soap base into small, uniform cubes—about one inch in size. This helps the base melt evenly without overheating. Place the cubes into your microwave-safe jug and heat on high for 30 seconds. Stir well, then continue heating in 15-second bursts, stirring in between, until the base is completely liquid and smooth.
Important: The melted soap base will be very hot. Let it cool for a few minutes until it is around 60°C. Adding your essential oil while the base is too hot can cause the delicate therapeutic scent to evaporate. Once cooled slightly, gently stir in your Lavender Essential Oil and dried lavender buds. Immediately pour the mixture into your silicone mould and leave it on a level surface to set for at least 4-6 hours, or until completely firm to the touch.
Step 3: Unmould and Enjoy!
This is the magical moment. Once your soap loaf is fully hardened, gently pull the sides of the silicone mould away from the soap to break the seal. Turn the mould upside down and push firmly on the bottom to release your creation. Using a non-serrated knife, slice the loaf into individual bars of your desired thickness.
The best part of melt and pour soap making is that there is no ‘cure’ time. Your beautiful, calming lavender soap is ready to use and enjoy as soon as it’s cut. Congratulations on your first successful project!
Advancing Your Craft: Where to Go From Here
Congratulations on taking your first steps into the wonderful world of handcrafted soap! You’ve learned the fundamentals of Melt and Pour, and now a truly exciting journey of creativity and discovery awaits. The techniques you’ve mastered are the perfect foundation for a rewarding new hobby, and the possibilities for what you can create are nearly endless.
As you grow in confidence, we encourage you to experiment. Your kitchen can become a creative studio where you refine your skills and develop a signature style. Once you feel you have truly mastered the art of Melt and Pour, you might feel the call to explore traditional soap making. This is where Cold Process comes in—a classic method that gives you complete control over every single ingredient, from luxurious oils to nourishing butters. It’s a rewarding challenge that allows for ultimate customisation.
Exploring New Ingredients & Designs
Before moving on, there is so much more to discover within Melt and Pour. This is your opportunity to transform a simple soap base into a functional work of art. Consider trying these beautiful techniques:
- Artistic Designs: Create stunning visual effects by pouring different coloured soaps in layers, using a skewer to create elegant swirls, or suspending small, pre-made soap shapes (known as embeds) within your bar.
- Natural Exfoliants: Add a therapeutic, textural element with pure, natural ingredients. Finely ground oatmeal can soothe the skin, while coffee grounds provide a stimulating scrub.
- Scent Blending: Move beyond single scents and become an aromatherapist in your own right. Discover beautiful new combinations with our range of 100% pure essential oils, such as calming Lavender paired with bright, uplifting Bergamot.
Your Trusted UK Supplier for Soap Making
As you advance on your soap making journey, the quality of your ingredients becomes paramount. At Freshskin, we are deeply committed to being your trusted partner every step of the way. As a UK-based, family-run business, we understand the passion that goes into crafting something by hand. That’s why we meticulously source only the purest, most ethical botanicals and soap bases, ensuring every bar you create is of the highest quality. We are here to support your craft with exceptional ingredients and friendly, expert advice.
Explore our full range of soap making supplies and start your creative journey today!
Embrace the Art of Homemade Soap
You’ve now discovered the simple joy of creating your own botanical soaps, from understanding the fundamental differences between Melt & Pour and Cold Process to crafting your very first lavender bar. Remember that the journey into soap making begins with a single, simple step, and the quality of your creation is rooted in the purity of its ingredients. The most important takeaway is that this is an accessible and deeply rewarding craft for everyone to enjoy.
As a UK-based, family-run business, we are passionate about providing only the finest, ethically-sourced ingredients from around the world, backed by our 100% Pure Essential Oils Guarantee. We believe that every beautiful bar of soap starts with exceptional materials, chosen with care and integrity.
Shop our high-quality soap making ingredients and start your journey today!
We are here to support you as you advance your craft and explore new creative possibilities. Happy creating!
Frequently Asked Questions About Soap Making
Is making soap at home safe for a beginner?
Absolutely, provided you follow safety protocols with care. The primary safety concern involves handling lye (caustic soda), which is a necessary ingredient for saponification. By wearing protective gear—specifically safety goggles and gloves—and working in a well-ventilated space, you can manage the risks effectively. Think of it as following a recipe in a kitchen, where respect for the ingredients and process ensures a beautiful and safe outcome for your botanical creations.
How much does it cost to start making soap?
The initial investment for a beginner in the UK is quite modest, typically ranging from £50 to £80. This covers essential reusable equipment like a digital scale, a stick blender, and silicone moulds, which you’ll use for every batch. The rest of the cost is for consumable ingredients such as pure oils, lye, and your choice of therapeutic essential oils. Starting with a simple, high-quality kit can be an economical way to gather everything you need.
What’s the difference between essential oils and fragrance oils for soap?
Essential oils are pure, botanical extracts derived directly from plants, offering authentic scents and therapeutic wellness benefits. As a brand committed to natural purity, we always recommend them. Fragrance oils, on the other hand, are synthetically created in a lab. While they can provide stronger, more varied scents that don’t fade as quickly, they lack the holistic properties found in their natural counterparts and don’t align with a truly botanical ethos.
How long does homemade soap last?
A well-cured bar of homemade soap has an excellent shelf life, typically lasting for at least one to two years. The longevity depends on the base oils used in your recipe; some oils are more stable than others. While the cleansing properties of the soap will remain intact, you may notice the natural aroma from essential oils gently fading after the first year. Storing your bars in a cool, dry place away from direct sunlight will help preserve their quality and scent.
Can I sell the soap I make at home?
Yes, you can sell your creations, but you must comply with UK cosmetic regulations to do so legally and ethically. This involves obtaining a Cosmetic Product Safety Report (CPSR) for each recipe, following Good Manufacturing Practice (GMP), and ensuring your labels are legally compliant. While it seems daunting, these steps ensure your products are safe for the public and build trust in your brand. We recommend researching the UK government’s official guidance thoroughly.
What is ‘curing’ and is it necessary for all types of soap?
Curing is the vital process of allowing your newly made soap to sit for 4-6 weeks in a well-ventilated area. During this time, excess water evaporates and the saponification process fully completes, resulting in a harder, milder, and longer-lasting bar. Curing is essential for cold process soap making. However, it is not required for ‘melt and pour’ soap, as that base has already undergone saponification and is ready to use once it has cooled and hardened.
Do I need to use preservatives in my homemade soap?
For traditional solid bar soap made via the cold process method, preservatives are not necessary. The high pH environment of the finished soap is naturally inhospitable to bacteria and mould growth. However, if you are making liquid soap or adding fresh, water-containing ingredients like fruit purée after the main chemical reaction has finished, a broad-spectrum preservative is crucial to ensure the safety and stability of your final product.